Tuesday, 3 November 2015

MATHS - Geoboard App for the iPad

John was using this app when I came to see him teach and it is available on all the school iPads. It is called Geoboard and is basically an electronic version of a real life board that, with the use of pegs and elastic bands, you can make a variety of shapes on. This is great to teach topics such as area and it is both visual and kinaesthetic.


Now what the app does, is that it takes away the fiddly nature of the Geoboard and also the temptation to flick the elastic bands and as a result removes any possible disruption. In addition - packing away is as simple as clicking a button!

Learners simply stretch bands by selecting them at the bottom and dragging them to a peg. Once attached to a peg , the band and then be stretched in any direction and attached to another peg to create a shape.


You can then choose a colour for the shapes and also annotate alongside them. Particularly useful for showing working out and pupil understanding. John used this a springboard to the main activity and I was impressed with how efficiently it was used and that how he planned to ensure that this did not eat up too much of his lesson.  


Now, iPads can  never replace the teacher, but it's clear to see that apps like Geoboard can greatly enhance teaching and offers great differentiation for those of differing learning styles. 

Thinking outside the box

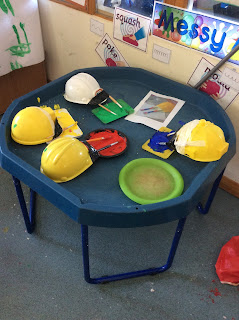
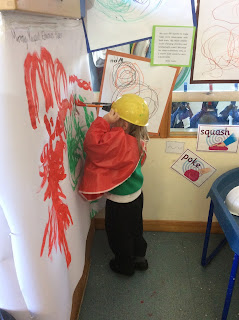
Before the half term break, Pippa notified me that something 'out-of-the-box' was going to be trialled down in Nursery that day and urged me to go have a look.  I was intrigued and so popped over in one of my free periods, and this is what greeted me:


Sue Michaels came up with the idea to develop gross and fine motor skills by attaching the normal paintbrushes that they use to a helmet!

I thought this was brilliant and the children were obviously enjoying themselves at the same time as being challenged! You know it's a great teaching idea when you want to have a go yourself!


 It is ideas like this, that push the boundaries/ mix things up a bit and make teaching and also learning more enjoyable and effective. Sue was worried that it may have fell flat on its face, but she ploughed on regardless and turned out to be a great success!

Tuesday, 29 September 2015

WINDOWS

DIFFERENTIATION


Windows is a great collaborative activity that can be adapted and used in most subjects. The example below is one that I have used in French with considerable success. It is relatively quick and easy to set up and there is minimum input from the teacher (always good!)


Points 1 & 2 prepared before the lesson 
  1. You start off with an A3 piece of paper and split it into 'windows' with a text/question/sum in the centre box.
  2. You then need to give titles to the other four boxes that become more challenging the lower you get (easiest in top left, slightly harder top right - more challenging in either of the bottom squares).
  3. Put the children into pairs (more able with less able) - label the less able the 'anchors'  or As- they stay with their sheet the whole time. The other 'Bees' or Bs move around. Your groupings should be more able with less able). Give them a set amount of time to complete the first square (i.e 3 minutes).
  4. After the time is up, ring a bell or simply say 'MOVE'  - the 'anchors' stay where they are and the more able 'bees' move clockwise to another sheet.
  5. The 'anchors' now have to explain to their new partner what they have just done with their previous partner. After a minute or so, start the timer again. The new partner can now suggest corrections / add to previous boxes and then together they tackle the next box. 
  6. Continue doing this until they have done a full circuit.
I like to go around after or during with a highlighter to draw attention to common errors that haven't yet been picked up. 

This is a great way for the more able to reinforce their knowledge and for the less able pupils to show their peers what they have done through demonstrating and explaining. The varying degrees of difficulty also makes it accessible to all ability ranges.

I have used this a few times (with Year 3 last year and the Year 8 Scholars) and the kids love it.


Friday, 28 August 2015

Welcome to the RCS Teaching & Learning blog!

Welcome

  The aim of this blog is to create a platform on which to share great teaching practice and ideas which will improve our teaching. It will have a general teaching theme, but I will also be posting G&T and Differentiation specific content. Some things will be useful and applicable to your teaching and there is bound to be things on here that you do already - so use it as you see fit. 

It is my intention to update this blog every week with great things that I have seen and read about. I will always make time for face-to-face discussion following a visit to your classroom and also any ideas and tips that you would like to discuss - I will strive to do so in person. However, time is a precious commodity in school, so here's a little bit of technology to help us out! This blog is also open to all of you to add and share resources and ideas so please sign up to blogspot and post away!

One other aim of mine is to transform the dreaded 'observation' into a positive learning experience for everyone involved. Absolutely no-one is a perfect teacher, so the person observing you can learn just as much from you as you can from them. Imagine it like an exchange of ideas rather than a performance after which you will be analysed and 'picked apart'. I have learnt so much from observing others in the school.


I hope you find this helpful! My door is also always open if you want to discuss anything you see on here.

Allan